How to unbrick a SandForce SSD
If you are here to unbrick your SSD, as you are one of the lucky ones who happened to buy a SanForce Controller-based device back in the days, you are in the right place. Your drive is either recognised as SandForce {200026BB} in your Device Manager / System Report, or is completely bricked.
Let's get started and see how will it be possible to unbrick your SSD.
But how did that happen? The SSD took no damage, it just suddenly stopped being recognized by my compuer!
It appears that you've encountered the infamous SandForce bug!
Perhaps it is now showing in your BIOS or device manager as "SandForce {200026BB}", or it is not giving any sign of life at all!
SandForce bug, showing as SandForce {200026BB}
But worry not... there is good chance that you'll manage to unbrick your SSD and bring it back to life by following this guide. The thing is: this is not going to be an easy one... it might take you several hours to perform all the necessary actions to unbrick your ssd. You will also lose all the data previously stored in your bricked SSD.
However, you will probably be able to unbrick your SSD, recover it and start using it again!
If I haven't managed to discourage you enough, let's start with a brief description of the issue: the SandForce Controller bug.
Yep, still SandForce bug, Windows Device Manager shows SandForce {200026BB}
The SandForce bug explained
(You can skip this section if you are only here for the juice)
SandForce used to be a Californian company, that designed and manufactued flash memory controllers for SSDs.
Around 2010, SSDs were booming into the market and gradually started replacing the HDDs in household computers. At that time, one of the biggest issues limiting the SSDs speed was their "controller": a fundamental component of an SSD, in charge of managing the istructions given to retrieve the data from the actual flash memory compartment of the SSD: the NANDs.
That was when SandForce came up with their SF2000 series: a very inexpensive controller which was however capable of achieving pretty high speeds.
OCZ and Corsair gladly implemented them into their SSDs, so that my OCZ Agility 3 had one too!
Little they knew of the latent problem those controllers had... which would make it impossible for the SSD controller to wake up in some cases, after the user leaves their device in hybernation or sleep mode for some time.
SandForce controllers were in fact prone to mishandle the SATA wake-up commands, forcing the controller into a "panic" mode, for which no true command exists to escape.
In such situation, the controller basically becomes unreachable, and since it is responsible for retriving and delivering data to and from the NANDs, we've basically lost our device, as it will only display as SandForce {200026BB} in the BIOS or in your System Report / Device Manager.
You will probably be asking yourself how are even going to solve this, since it looks like we have to work at a rather low level to work on the SSD's controller.
How can I unbrick my SSD, now?
It is exactly what we are going to do. Through the SATA protocol, we will access the SSD's controller and give some instructions to wipe its current data and accept a new firmware, and the only reason for which this is possible is that after SandForce went bankrupt some blessed soul shared the company software they used to initialise their products.
The usage of said software will be demonstrated today, along with some very top-secret leaked documents!
Disclaimers
As Computer Lounge, we have not uploaded or distributed the SandForce software anywhere and we are not responsible of maintaining it. In this blog post, you are only able to find links to the material only because these are available elsewhere on the web, and are shown for reference, only with the only scope of demonstrating this procedure and with no intention of incouraging users to follow it.
Any action followed by using this guide, in full or in part, is done at the user's risk, and we do not bear any responsibility for any of your actions.
The reader should be aware that any of the displayed action will lead to an integral loss of warranty.
What we'll need
- A computer, to which a quick access to a spare SATA port is available (we will need this in order to connect our faulty SSD and work on it)
- A copy of UnetBootin, which you may retrieve here
- An 8GB-minimum USB drive
- A copy of Fedora 14 32 bit, which you may download from here (net-install for permenant install on a hard drive) or here (LiveDVD; may be installed on a USB key)
- The leaked company software and top-secret documents, available here (Yandex) or here
- The licence checksum generator, available here
- A phillips screwdriver
- Some wick or wiring made of copper or otherwise any other conductive element other than asbestos
Unbrick the SSD
Let's start our journey to unbrick our SSD. It will take a lot of your patience. Good luck!
Installing Fedora
We will have to start off by installing a version of Fedora 14 32 bit.
Firstly, you'll have to download either the net-install or the LiveDVD.iso version. If you do have a double SATA port on your computer, then you may grab the net-install and use Fedora in dual boot with the current system, whilst leaving the spare SATA port for when you'll need to connect the faulty hard drive, the advantage of this is the ability to reboot the system as you'll be on a permanent installation.
Differently, if you only have or can reach one SATA port, or if you just prefer, you'll need the LiveDVD version. Note that you won't necessarily need an Optical Disc Drive, as you may as well use UnetBootin to install the LiveDVD version on a USB stick, but keep in mind that if you opt for the LiveDVD version, you should not reboot your system, as all the software you'll install, files you'll create, etc. will be volatile and will disappear as you reboot.
Make sure not to download the 64 bits version: it's incompatible with the software we'll use to unbrick the SSD!
Let's start off by opening UnetBootin and select Disk Image, choose "ISO" from the dropdown and then open the Fedora image you have downloaded before.
On the bottom, now, choose USB drive and from the Drive dropdown, select your USB drive. I strongly suggest to remove any other USB device in order to accidentally wipe out the wrong drive!
Once UnetBootin is done, boot from your newly-created drive and configure your freshly-installed Fedora.
Identifying your SSD's specifications
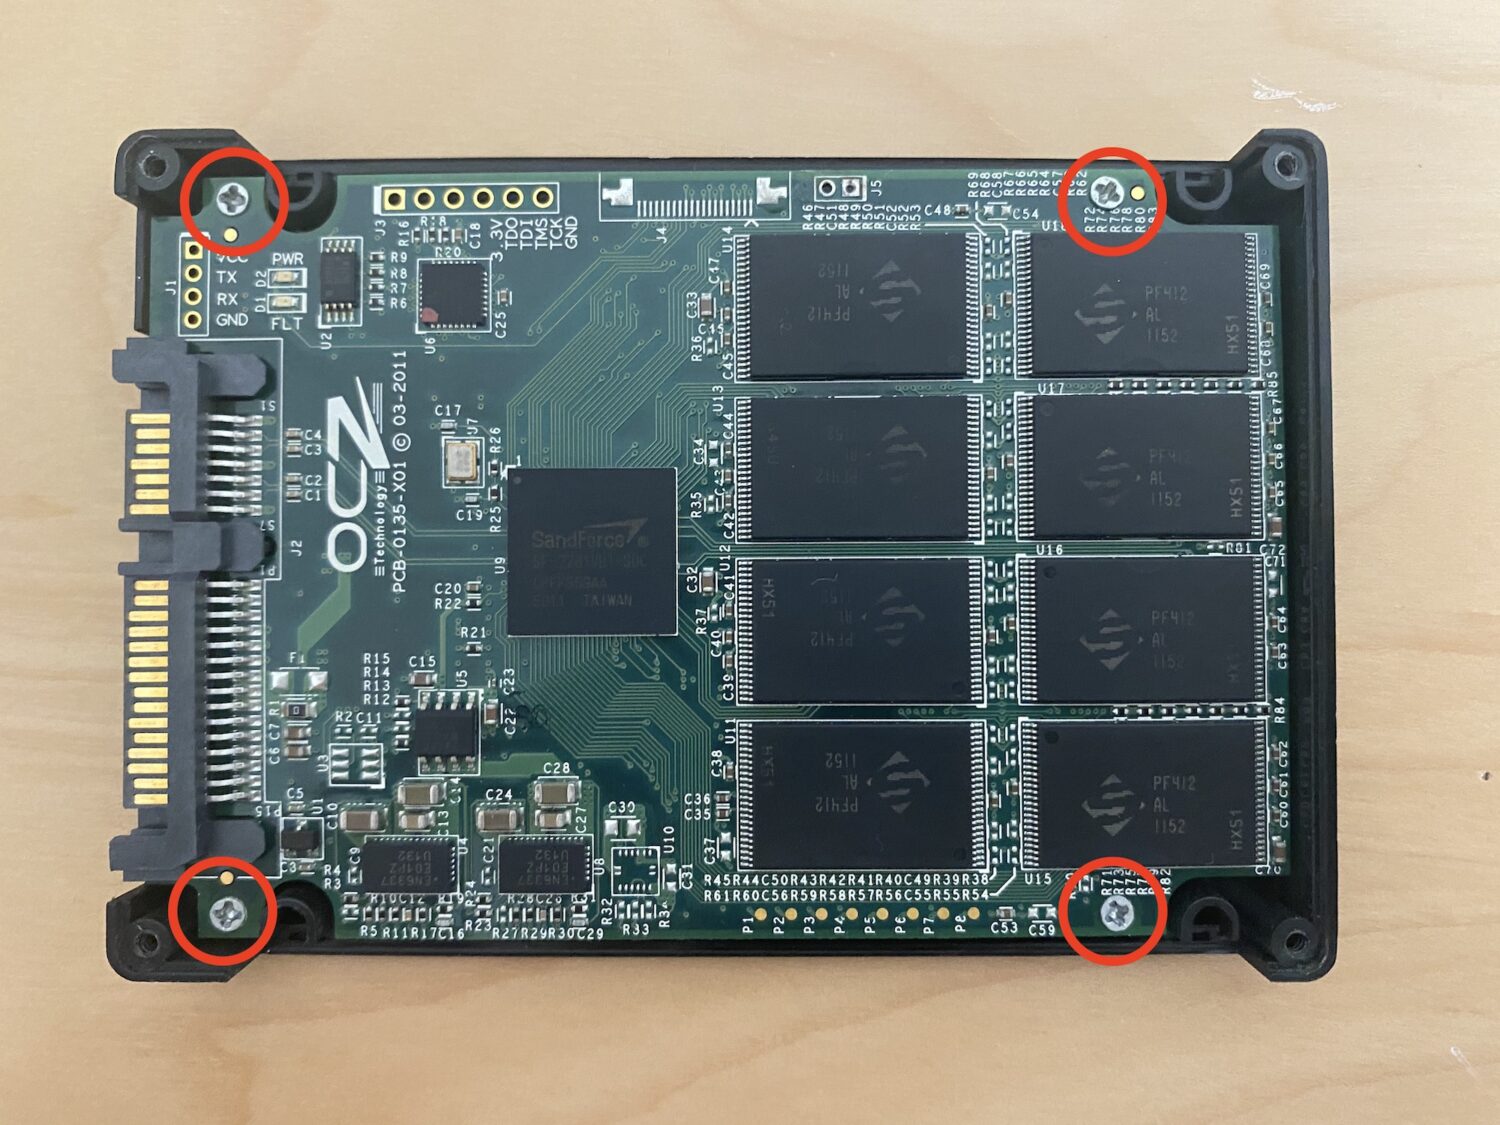
Time to take your screwdrivers, guys! Let's open the casing our SSDs to see our devices in their original, naked and uncontamined beauty.
You will have to unscrew the following to open an OCZ Agility 3, your model should not look too different.
From the pictures above, you may see that not only the screws are highlighted. In fact, we may get ourselves ahead of the game by taking note of some very useful data.
Boxed in yellow, you may read:
2.5" 120GB SSD SATAIII
My device has a Nominal Form Factor of 2.5 inches, 120G of declared size and SATA3, which is 6GB/s.
Take not of those details, because we'll use it later.
Boxed in orange (twice), it also says:
AGT3-25SAT3-120G
If you see your product/model number take note of that as well as it will come in handy later on.
Now take a look at the picture below:
Here we need to identify three important pieces of data:
- SandForce controller version
- Flash vendor and serial number
- Flash packages count
The black square with the SandForce logo printed on it, is indeed our SandForce controller. Its version will be written on there, in my case it is "SF-2281", as you may see highlighted in green.
To the right of the controller, there are 8 flash memories. I have highlighted one of them in orange. Count them all on your device as well, as that makes your Flash package count. Make sure you flip your SSD too, because the ones on the other side of the device, if any, have to be counted as well!
Also, taking a closer look at a flash memory, we can see that all of them have a funny logo and some alphanumeric strings.
The longer alphanumeric string, in your case, should correspond to the Flash memory serial number,.
With the logo, you should be able to identify your flash vendor. If you are in doubt, type in the serial number you see on Google.
You can however see that in my case it is much harder to understand what is the serial, and also that S logo is not familiar at all. If you happen to have it as well, then you have "SpecTek" flash blocks. In this case then make sure you read the below subparagraph, otherwise skip it and go directly at "Having the drive detected".
The thing about SpecTek NANDs
So yes, you have SpecTek NANDs as well. It will be very hard for you to get any information about them, and most importantly, you will not find them in the document that we'll use later on. Let's begin by saying that SpecTek NANDs are actually Micron flash memories, which for some reason did not pass their quality check, but were nonetheless found to be fully functional, so they are rebranded as SpecTek, which uses their own serial numbering.
So, if you happen to have SpecTek flash memories, you will have to insert "Micron" as flash vendor in the "Identify your release config ID" part of the guide. However, as you will be unable to type in the flash serial number, you will have to try and input as much specific information about the memory as possible.
In order to find what you need, you should first open this tool from Micron to identify the actual serial number of your SpecTek NAND. Then you may have a look a this document from SpecTek, which will help you determine the specifications of your flash memory based on the serial number you have obtained. This can help finding info such as your "package type".
Having the drive detected
Take a look at the below picture:
Highlighted in red, you may see the J5 pins, which you may have to short in order to have your device detected.
Boxed in purple, instead, are the Power and Fault lights.
Now connect your SSD to the spare SATA port and access to the BIOS. If you are able to see your device in the boot-list, you may skip to the next section.
This is where you need to use your copper wick to connect together - i.e. to short - the two pins shown in the above picture.
Shutdown your computer, connect your SSD and short the two pins (make sure you do not short anything else!), keep them shorted whilst you press the power button, and you should see a brief flash from the red "FLT" (fault) light on the SSD. You can now remove the wick in order to unshort the pins.
Important: do not solder the J5 pins. Although it won't do damage, the recovery procedure will fail at some point if you keep the pins shorted all the time and you won't manage to unbrick your ssd!
The BIOS should detect the drive as SandForce {200026BB} until the computer is powered off.
You'll need to perform this procedure every time you restart your computer, until we'll have successfully unbricked the SSD.
Identify your Release Config ID
It is time to open up the top-secret file named FW_Worksheet_SFI_SF-2000_140120_Confidential_Gold. It is contained in the "Config List" folder of the bundle you downloaded. That is an excel file containing some IDs unique to your device, that we'll later use to help us unbrick the ssd.
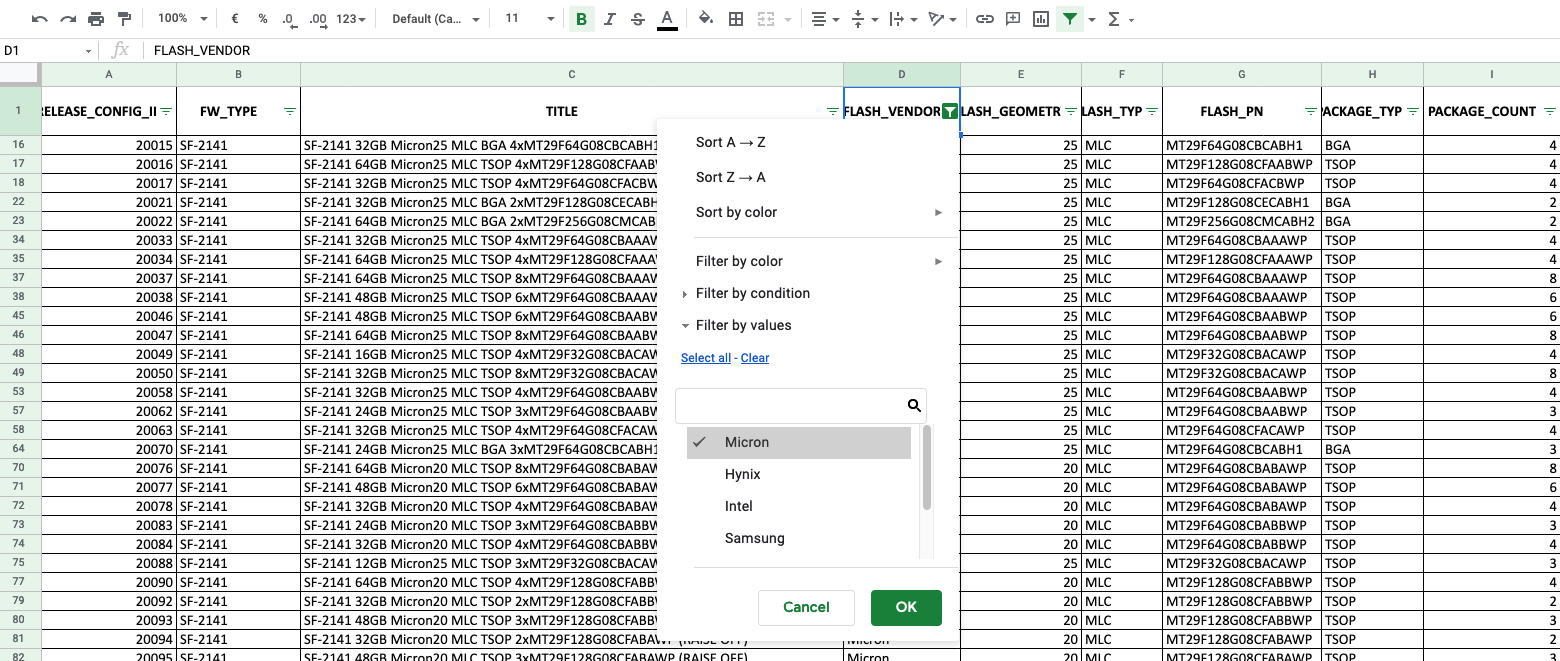
I suggest to just import your excel file into Google Sheets. You will find two worksheets in the document, open the one named "Full Configuration List" and select the title row, then click on the funnel icon to activate the filtered view.
Select the first row and click on the funnel icon tho activate the filtered view
In order to identify. your release config ID, you will need to match all the information that we earlier retrieved, and filter the sheet to eventually only show the entry that matches your device, as per the below example.
Start adding filters to reduce the number of shown entries
Add as many filters from the below list as you can
The configuration ID ( RELEASE_CONFIG_ID ) is to be found by looking at all these parameters and trying to match the greatest number of them, until only one element is shown in your sheet.
Below is a list of all the elements you may specify in order to find your config ID. The most useful are in bold and described in detail.
- FW_TYPE
- TITLE
- FLASH_VENDOR
- FLASH_GEOMETRY
- FLASH_TYPE
- FLASH_PN
- PACKAGE_TYPE
- PACKAGE_COUNT
- PACKAGE_DENSITY
- PACKAGE_DIE_COUNT
- CAPACITY_RAW
- CAPACITY_USER
- 512_LBA_COUNT
- NON_512BYTE_SECTOR_SIZE
- RAISE_ON
- VERSION_DEMO
- VERSION_RELEASE
- TOPO_ID
- SATA_SPEED
- INDUSTRIAL_FEATURES
- VALIDATED
- ASIC_SUPPORT
Now, let's analyze the most important data to put into our filter. If you manage to filter with all of the below (or almost), you should end up with 1 result only: which will reveal your config ID!
Note: if you end up with multiple plausible IDs and you have not got any other piece of data that you can use to further filter the list, you can try with one config ID at a time until you manage to unbrick your SSD.
Despite having inserted all the possibile info we came up with three config IDs, so we'll have to try them all
FW_TYPE : Here goes your controller serial number
FLASH_VENDOR : The manufacturer of your flash memories
FLASH_GEOMETRY : It is the height of the internal volumes of your NAND flash, expressed in nanometers. It may range typically between 20 and 40nm, but to be sure of that you should google your flash serial number.
FLASH_TYPE : Most of the times, your flash memory will be of MLC (Multi Level Cell) type. If in doubt, however, try to have a look at your specific flash by googling your flash serial number.
FLASH_PN : That is the serial number written on your flash blocks.
PACKAGE_TYPE : It's the housing type of your flash blocks. It's typically
TSOP, although even for this one, it's better if you look it up on Google.
CAPACITY_RAW : The capacity of your SSD. This might be confusing as your vendor may have written something like "120GB" or "60GB". In fact, those would respecitvely be "128GB" and "64GB". So have a look and pick the closes entry to your declared size.
PACKAGE_COUNT : This is the number of flash blocks. You have to count them on both sides, so if you have 8 per side, it should be 16 in total.
SATA_SPEED : This is going to be either 3 or 6. It is safe to say that most modern SSDs should support SATAIII, which goes up to 6GB/s speed, thus you wanna filter "6" here. If you are however confident that your SSD is SATAII only capable, consider this field 3""!
Create a licence file for your config ID
In the "Licence files" folder of the package, we may find three licence files:
- asiacom_SF-2000_20110815_lic.lic
- asiacom_SF-2000_20120629_lic.lic
- hasee-sf-2000_lic.lic
If you open them up with a text editor, you will notice that they contain a list of config IDs. Before, you had to look for the licence which contained your config ID and unpack all the configuration files it contained. Today it is possible to save some time by creating our own version of the licence and only unpack the firmwares we need.
Firstly, open this web-page within your Fedora installation and take a look at the code below:
<?xml version='1.0'?>
<customer date_created="08-12-2011 16:46">
 <customer_name>AsiaCom</customer_name>
 <customer_id1>162</customer_id1>
 <customer_id2>0</customer_id2>
 <stampfunction_manufacturing>False</stampfunction_manufacturing>
 <stampfunction_flashware>True</stampfunction_flashware>
 <stampfunction_flashware_encrypted>True</stampfunction_flashware_encrypted>
 <configuration_id id="CONFIGIDHERE"/>
 </customer>
Just replace CONFIGIDHERE with your own config id, and if you have multiple config ids you'd like to unpack, duplicate the line so that you have more than one <configuration_id ... />
Now copy everything in the clipboard, then open up a terminal session and:
cd Desktop
nano licence.lic
Paste the contents of your clipboard there, then go Ctrl+X to exit, save the file by pressing Y and confirm the file name with Enter.
Now rename the checksum utility you downloaded to "checksum" (as its name will be a hash) and drag it to the Desktop, then give the following commands:
chmod +x ./checksum
./checksum licence.lic
The above commands will grant execution priviliges to the checksum utility, then run it. This will add a checksum line to your licence, making it valid and recognisable by SandForce OEM Package Manager.
Your licence file has now been correctly created and check-summed. You'll find it on the Desktop as licence.lic
If you didn't want to create your own licence, you could always use one of the three licences by just identifying the one mentioning your own config ID, however this is not recommended as it will slow down the unpacking process.
Setting up the software we need on Fedora
In the "Programs" folder of the package, you will find a bunch of utility installers that we'll need in order to have the recovery software working, as to fully unbrick the ssd.
Thus, double click on the following files to open the package manager and install them:
- lsscsi-0.23-2.fc14.i686
- sg3_utils-1.29-1.fc14.i686
- smartmontools-5.40-5.fc14.i686
We double click on each package we need to install and Fedora presents s with this dialogue
You will also find mailx-12.5-1.fc14.i686, which probably does not need to be installed, since it should be already present. You can try to double check by starting it anyway and see if the package manager sees it as already present.
The programs we'll need to install
Working with SandForce's official software
It's time to work with the official software that that SandForce engineers used to initialise their SSDs. We will perform three distinct operations with it, i.e:
- Unpacking the firmwares bundle in order to extract the one appropriate for our specific device
- Editing the unpacked firmware to make it easily recognizable by our hard drive
- Uploading the firmware on the controller
At the end of the first step you will probably unbrick your SSD, obtaining a working drive. Thus, let us begin!
Unpacking the original firmware with SandForce package manager
It's time to open up the official software that SandForce engineers used to initialise their controllers, though we'll use it to unbrick the SSD.
Before we do anything, make sure that all the files you downloaded are on the Desktop (or any folder within your home directory).
Do not run the SandForce utilities directly from an external drive, as this might cause the "Process execution failed. Failed to start" error in Package Manager.
In the package, said software is available in two different versions. So you will find two folders:
- SF_Genesis-v1.7.0.01020130612-fc14-32bit
- SF_Genesis-v1.5.21.20110919-fc14-32bit
Depending on the characteristics of your drive, one may work and the other one may not, thus start by testing the v1.7 and if something goes wrong you can always try with v1.5 later on!
Alongside the two said folders, you will also find a file named "FW_PPRO_5_8_2_Release.906190.release.dfp". This is a bundle that contains hundreds of firmwares, among which, hopefully the one of your SSD's controller. We will need to "unpack" it, in order to extract the correct firmware and then modify it, and to do that we'll use the "SandForce OEM PackageManager" software.
Identifying the correct release of the package
The SandForce software will work by extracting from the .dfp file all the firmwares specified in the licence file that we created. That means that if you didn't create a licence for your specific config ID, the SandForce package manager will unpack all the firwmares for all the config IDs contained in the licence file, and that will take a while!
Furthermore, what you downloaded so far is version 5.8.2 of your .dfp, and it could be that the firmware for your config ID is contained in another release. Such releases could be:
- FW_PPRO_5_2_2_Release.672199.release.0.dfp
- FW_PPRO_6_0_A_Release.1134440.release.dfp
- FW_PPRO_6_0_9_Release.1129404.release.dfp
- FW_PPRO_6_1_8_Release.1115287.release.dfp
- FW_PPRO_E_A_I_Release.936211.release.dfp
- FW_SF-2000_MP_3-3-0_Client.dfp
If your firmware isn't contained in the 5.8.2 release that you downloaded, you will know because the process that you are about to start will fail with this error:
Licensed Images : No licensed configurations found
At this point you'll know that you need to look for another release of your .dfp file. Some, but not all, are available by connecting at this ftp. You will just need to repeat the process described below, but with your new .dfp
Input data in the SandForce package manager utility
In each SFGenesis folder, we'll find several intersting executables. The one that we will start with is "_SF_OEM_PackageManager": open it.
As you launch the software, you will be presented with a screen asking for said data:
Distribution Firmware Package File - that is the .dfp file we mentioned earlier on
License File - The licence file that you previously created (or, if you've chosen to use one of the three pre-made licences, one that contains your config id)
Destination Folder - The destination folder of your unpacked firmware. Note that if you are working from a live DVD version of Fedora, you'll need an external USB drive to store the above data. The output will be about 2GB in size, so make sure your drive is large enough.
Customer Identification Number - This must be set to 0
Diagnostic Unlock Key - This should be 1,2,3,4,5,6,7,8,9,0,1,2,3,4,5,6
Firmware Revision Override String - It's not extremely important, but since we are indeed using the 5.8.2 version of the SandForce controller firmware, we can insert 5.8.2 here.
This is the way it should eventually look like:
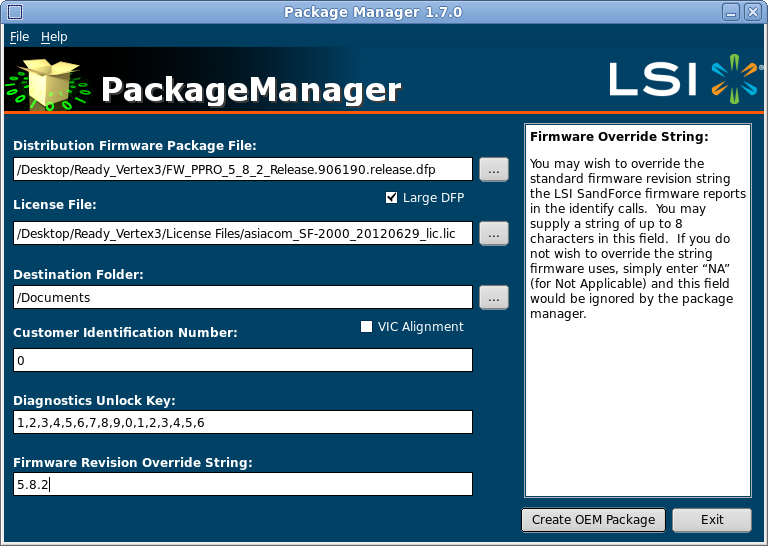
Inputs to insert in SF PackageManager
Note: As we mentioned earlier, it is important that you are using Fedora at the exact version of 14.0, as with Fedora 14.1, some unexpected errors may arise when trying to use the PackageManager software.
After you've inserted and double-checked all the data, click on Create OEM Package. It will start unpacking the firmware in your selected destination, and it will take about 20 minutes. Worth waiting if you arrived up to this point, as you are close to unbrick your ssd!
Time to grab a cup of coffee! ☕
Editing the unpacked firmware with SandForce Configuration Manager
If we now open up the destination folder we specified earlier, we'll see that there will be a ".mfp" file, which is our Unpacked Firmware File, The folder will also containe one or more ".driveconfig" files, corresponding to the config IDs you've entered in your licence file.
You may find in the above folder some files with the .edriveconfig (an additional "e"). We are not working on them so make sure not to select them!
Let's now open the **SF_ConfigurationManager ** executable from your SF_GEenesis-v1.XX folder and open the .driveconfig file corresponding to your config ID (if you came up with several config IDs, just pick the one you'd like to start with).
The three inputs below are optional, however since we're here, it is a good practice that we fill these ones in, as it'll ease a proper device recognition from our machine.
Model No. You can make up a model number here, but I suggest that you use the device model number that you found on your device, as we saw earlier. In my case it was declared as "PN" on the exterior label, so: AGT3-25SAT3-120G
Serial Number - Enter whaterver number you deem appropriate. This can be any number, including your favorite one, ie. 123456789
Device Nominal Form Factor - Most likely, this will be 2.5 inches, unless you're confident that your SSD has a different form factor.
Don't touch any of the other parameters!
Click on the Save button. We have now succesfully modified your .driveconfig file, which should look like this:
SF ConfigurationManager
Forcing the new firmware on the controller using SandForce Genesis
We will now progress into some steps which are a bit more difficult.
Differently from the softwares that we previously used, this one does not have a GUI (Graphic User interface), but it rather has a Command Line Interface. In fact, that's not really a big deal, but you will have to be careful here and double check everything you type, as a minor mistake could cause you some headache.
Open up the "Terminal". You may recall it from Applications > System > Terminal, but the Ctrl+Alt+T shortcut should work as well on Linux.
Firstly, we will have to cd into the SF_Genesis-v1.7 through the Terminal, so that we have "cd {path to the SF Genesis executable}". It will be sufficient that you just type "cd" into the Terminal and then drag and drop the folder inside the terminal window: its full path shall magically be inserted for you.
As I have the softwares folder on the desktop, in my case this will be something like:
cd /Desktop/Ready_Vertex3/SF_Genesis-v1.7.0.01020130612-fc14-32bit
Now get ready, it's time to finalise everything we've done.
This final step is quite crucial and, again, it is imperative to double check everything you are inserting to ensure your success.
This is the base command
./SF*Genesis –PROCESS_SSD {disk address}_ {_path to the unpacked firmware}_ {path to the .driveconfig} 12345 www123 log = *{path to the log file}_
The values between brackets {} are variables and need to be replaced with your actual values. Below, every item of this command will be described in detail:
-
SF_Genesis : This invokes the SandForce Genesis software contained in the folder we have just reached through the cd command
-
-PROCESS_SSD : this "flag" tells the SF_Genesis executable that we would like to initialise a device
-
disk address : in order to find this, we need to open a new terminal window and type:
sudo lsscsi
The lsscsi command shows the address of all our drives in the left-most column
This will list all the attached drives and their "address". You will need to look for the item named SandForce {200026BB} or similiar. Its address will be something like 0:0:0:0, so after you have identified that keep note of it and crack on
- path to the unpacked firmware: This is the full path to the unpacked firmware with ".mfp" file extension that we spoke about before. Again, it will be sufficient that you drag and drop the .mfp file into the terminal to have its full path automatically written in the windows
- path to the driveconfig: This is the full path to the .driveconfig that we edited with the SF ConfigurationManager software. Again, it will be simply a matter of locating and then dragging and dropping it into the terminal
- 12345 www_123 : I am not sure, but these are fundamental parameters, so make sure you don't leave them out
- log={path to the log file} : You'll just have to specify a path for your log file to be produced, after the "log =". This is very important, because the any error will be described in the log and you may use Google if you get stuck... You have to create a file named "fw.log" and then drag and drop it into the terminal as usual. FYI: to create the fw.log, you can just copy any file, and then change its name AND extension by just renaming it.
Ok, time to have a thorough double check of what we have written. This is what I come up with:
./SF_Genesis -PROCESS_SSD 0:0:0:0 /home/user/Documents/FW_PPRO_5_8_2_Release.906190.release--0/FW_PPRO_5_8_2_Release.906190.release.0.mfp /home/user/Documents/FW_PPRO_5_8_2_Release.906190.release--0/Configuration_Files/22189.0.driveconfig 12345 www_123 log=/home/user/Desktop/fw.log
Press Enter and wait one the longest couple of seconds of your life.
If you see this:
****** PASS ******
PASS obtained after firmware flash with SF-Genesis
You can celebrate. Congratulations, you have just unbricked your SSD. You should be proud of yourself as that REALLY wasn't easy peasy! Disconnect your SSD, take a deep breath and plug it in again... This time, it will be recognised and will work as you expect.
If, instead, you had a ****** FAIL ******, please don'despair. Read on the following section and try to diagnose the issue
Forcing the new firmware on the controller using SandForce Genesis
Many users will have to continue on reading through this section. It is completley normal as during the whole process we had ample room for mistakes. Let's now analyze the main solutions that will lead us to an eventual success!
Try with SF_Gensis-v1.5
Sometimes the flashing may fail because on an unclear error. This error might not manifest itself altogether if you try to input the flashing command using SF_Genesis 1.5 rather than 1.7.
The errors you may get at this point are several, among which:
FATAL_ERROR: Could not perform the FORMAT() operation on the drive… (0x0000C048:SF_SCT (C048h): Root Creation Failed (MFB format))
Note that you might get the above even in the event that you need to set your External Write Project to Yes, as detailed below.
That means that it will not be necessary for you to re-do the whole procedure, but just come back to the chapter where we input the terminal command with SF Genesis, by clicking onto this link or by using the table of contents on your left.
This time, however, please have care of dragging the the SF_Genesis-v1.5 folder when you give the "cd" command.
Look out for spelling mistakes
Just really check the spelling of your commands. It's likely that you may have made some mistakes at some point. They can be anywhere from the path to one of the files, one extra symbol or space. Make sure you are typing a perfect command or you won't unbrick the SSD!
On top of that, we earliere mentioned that some .edriveconfig file are present in the same folder where you have your .driveconfig ile. Make sure you are not accidentally dragging your .edriveconfig file, as this will indeed cause the procedure to fail!
The flashing procedure fails because the ".edriveconfig" was erroneously dragged in
Remember to un-short the J5 pins
Another common mistake is to leave the J5 pins connected together while performing the reset procedure. Shorting the pins might be necessary for you in order to have your SSD recognised as SandForce {200026BB} in the first place, but remember to only keep them shorted for a couple of seconds after you have started your machine, as otherwise SandForce gensis WILL throw an error at some point, which should be:
FATAL_ERROR : Could not perform the ReadDriveConfigUnique () operation on the drive … (0x12000004: SF_SG_HOST_BAD_TARGET_ERROR)
Set the write project to external
Another common error is:
FATAL_ERROR: Could not perform the FORMAT() operation on the drive… (0x0000C048:SF_SCT (C048h): Root Creation Failed (MFB format))
This one will require you to edit your config file with SandForce Configuration Manager, this time however selecting the "Exernal Write Project" setting to "Yes"
The External Write Project option in SandForce Configuration Manager. It is set t o "No" in the picture, and you need to set it to "Yes"
You can come back to the Configuration Manager steps by using the Table of Contents on the right or by clicking this link.
Make sure you are using the correct .driveconfig
If you get this error:
FATAL_ERROR: Could not download MFB to the drive ... (0x11000001: SF_SG_DEVICE_CHECK_CONDITION_ERROR)
Or perhaps this error:
failed command: DOWNLOAD MICROCODE
It likely means that the .driveconfig file you have chosen is not correct, you need to try with another one.
At some advanced point during the flashing procedure, you may also get a table that looks like this:
+------+------+------+------+--------+--------------------------------------------+---------+
| Bus | CE | Die | Lane | Value | Result Notes | Overall |
+------+------+------+------+--------+--------------------------------------------+---------+
| 0 | 0 | 0 | 0 | 0x0374 | N4,N5,N6,N8,N10 | FAIL |
+------+------+------+------+--------+--------------------------------------------+---------+
This is going to be much longer, but for the sake of simplicity we're only showing one line here. If you see "WARNING" in the "Overall" column, it means the sector test has passed, but with some warnings. If you see "FAIL", like in the example above, the test didn't pass and you won't be able to fix your SandForce SSD as yet.
A failure occuring at this stage likely means that your .driveconfig is close enough to pass the initial tests, but it's not quite right as it fails for the sector-specific tests. Try a different .driveconfig file and possibly seek for help in the comments below, and try to revive your SandForce SSD!
Get support from the community
If you have any doubt or just found a solution to a problem, please write a comment below. The comment section can be inceredibly useful and save a lot of hassle to other users who are trying to unbrick their ssd!